

Home > Tutorials > How to convert Photo to an Icon
How to convert Photo to an Icon
In this manual:
- What is icon?
- Selecting Windows Icon mode
- Importing source image for converting
- Editing source image
- Selecting crop regions
- Working with styles
- Adjusting icon sharpness
- Saving icon
What is icon?
To get started with Icon Constructor quickly, we highly recommend you
to review the description of the .ico file format to
get better understanding of the program's operation techniques. The
complete description can be read in the article ![]() What is an Icon?
What is an Icon?
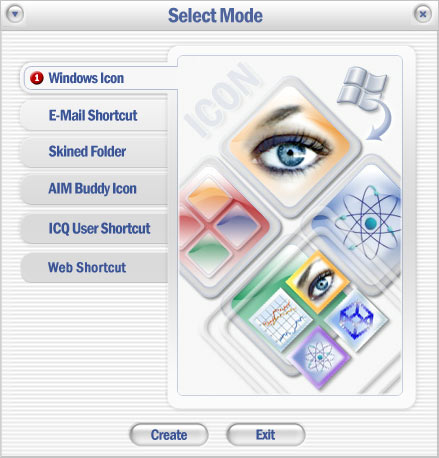
Selecting Windows Icon mode
Icon Constructor offers a great number of ways to
create and use icons. Since we are going to create an .ico file, we
will need to select the Windows Icon (![]() ) mode in the Select Mode dialog on startup.
) mode in the Select Mode dialog on startup.
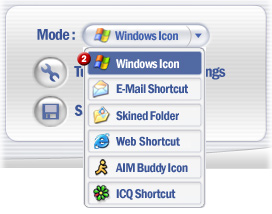
Besides using the startup dialog, you can also switch
mode in the program's main dialog. For that purpose, use the Mode drop-down list in the bottom-right corner of the main window. Clicking
on the drop-down list will open the menu with all available modes. To
create an .ico file, we will need to select the Windows Icon (![]() )
on the menu:
)
on the menu:
Importing source image for converting
Icon Constructor supports all major image formats, such as JPEG, BMP, PNG, GIF, PSD, TGA, PCX, and TIFF. Please note that the following formats are to be used for converting images to an icon with the original transparency: BMP(32-bit), PNG(24-bit with alpha-channel), and Photoshop PSD. Besides these major image formats, Icon Constructor supports importing still images from video files, such as AVI, MPG, and Macromedia Flash(SWF).
Editing source image
Often times, source images do not demonstrate the best quality. Digital shots' typical problems include poor contrast, oversaturated images, overdosing of blue color, and many others. Icons Constructor offers several editing tools that allow solving these and other problems.
The editor toolkit takes care of functions like:
- Rotating image 90°, 180°, 270 °
- Mirroring image vertically or horizontally
- Auto-Contrast
- Auto-Levels
- Brightness and contrast settings
- Sepia, Black and White effects.
Transforming image
The Select Source Region section of the program's main window has several tools for the basic transforming of images:
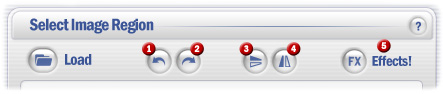
- Rotating image 90° CCW (
 )
) - Rotating image 90° CW (
 )
) - Mirroring image vertically (
 )
) - Mirroring image horizontally (
 )
)
Editing image with FX Studio
To run the image editor, click on the Effects! (![]() )
button:
)
button:
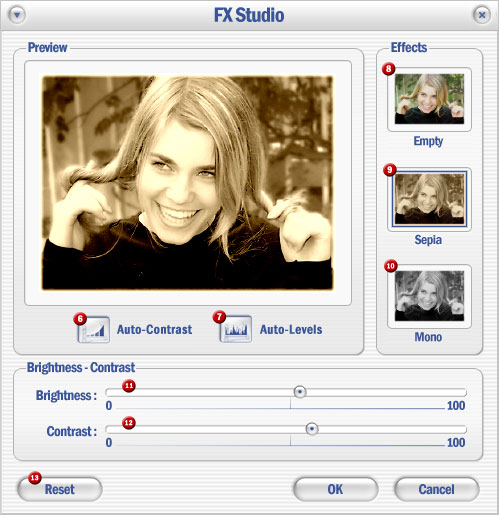
- Auto-Contrast (
 ).
This effect evenly distributes the level of brightness by bar chart.
It is very useful for the correction of overexposed or dark
photographs. Applying this effect makes dark areas even darker and
bright areas even brighter. Thus, the photograph becomes more
contrast..
).
This effect evenly distributes the level of brightness by bar chart.
It is very useful for the correction of overexposed or dark
photographs. Applying this effect makes dark areas even darker and
bright areas even brighter. Thus, the photograph becomes more
contrast.. - Auto-Levels (
 ).
Unlike the Auto-Contrast function, which corrects image by a bar chart,
Auto-Levels change image by the bar chart of each channel. This effect
allows resolving the problem of overdosing image with a particular
color. Digital images are often oversaturated
with blue color. The Auto-Levels function allows getting rid of this
undesirable effect easily.
).
Unlike the Auto-Contrast function, which corrects image by a bar chart,
Auto-Levels change image by the bar chart of each channel. This effect
allows resolving the problem of overdosing image with a particular
color. Digital images are often oversaturated
with blue color. The Auto-Levels function allows getting rid of this
undesirable effect easily. - Effects. FX Studio allows
applying two styling effects - Sepia (
 )
and Monotone (
)
and Monotone ( )
- to a photograph; the last effect is also known as Black and White.
To remove these effects, use the Empty (
)
- to a photograph; the last effect is also known as Black and White.
To remove these effects, use the Empty ( ) option on the selector.
 - Brightness-Contrast. These parameters allow
adjusting image brightness and contrast by hand. The Brightness (
 )
parameter varies between 0 and 100; the original level brightness of
an image is 50. The Contrast (
)
parameter varies between 0 and 100; the original level brightness of
an image is 50. The Contrast ( )
parameter also varies between 0 and 100, and its original level is
also 50.
)
parameter also varies between 0 and 100, and its original level is
also 50. - Reset Settings. To reset settings to default, use
the Reset (
 )
button. Clicking on this button will discard all changes made to the
image and will return the image to its original state.
)
button. Clicking on this button will discard all changes made to the
image and will return the image to its original state.
Selecting crop regions
Icon Constructor has two ways for selecting crop regions: Normal and Fixed. The first one is primarily used for converting photographs to icons using styles; the second one is mostly used for converting images with the original transparency. The fixed mode allows cropping regions of exact size; e.g., 48x48 pixels. Using this mode is recommended when you have image available for al formats and want to get an icon that will look just the way it looks on the image, without resizing anything. The normal mode allows cropping regions of custom size for scaling them to selected icon size. For example, when selecting a region, you can mark an area of 150x150 pixels, and finally the cropped portion of the images will be scaled to the required size - for instance, to the 48x48 format.
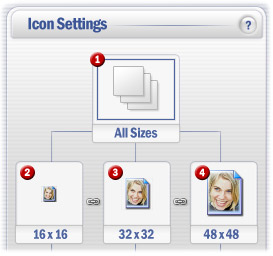
For each icon format, you can define its personal crop region. The
program's main window has the Icon Settings which has four selectors: All (![]() ), 16x16 (
), 16x16 (![]() ), 32x32 (
), 32x32 (![]() ), 48x48 (
), 48x48 (![]() ).
When the All option is selected, all formats will have
the same crop region. If you want to define a crop region for each
format individually, you will need to use the selectors of 16x16, 32x32,
and 48x48.
).
When the All option is selected, all formats will have
the same crop region. If you want to define a crop region for each
format individually, you will need to use the selectors of 16x16, 32x32,
and 48x48.
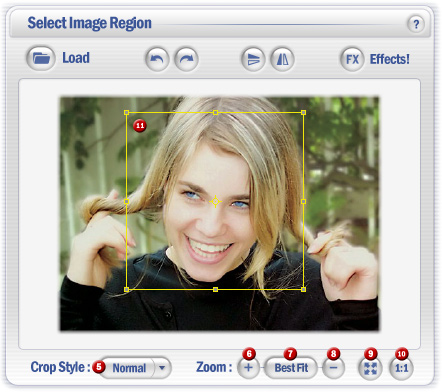
The following functions are available for selecting crop regions:
- Crop Region Rectangle ().
Use this rectangle to set the crop region. In the normal mode, you can
select an area at any position and with any size. To change the region size, grab a corner or side part of the
rectangle and drag the rectangle to the required size. To change the
position of the crop region, click on the left mouse button while
having the mouse pointer within the rectangle area, then drag the
rectangle to a new position, and then release the mouse button.
- Crop Styles (
 ).
There are two crop modes available in the program - Normal and Fixed.
The first one allows cropping regions of any size and then
transforming these regions to the required icon sizes. The second one crops regions of predefined, fixed size only,
depending on the format selected for editing.
).
There are two crop modes available in the program - Normal and Fixed.
The first one allows cropping regions of any size and then
transforming these regions to the required icon sizes. The second one crops regions of predefined, fixed size only,
depending on the format selected for editing. - Zoom. For more convenience, the program allows
zooming source image:
- Zoom in ()
- Zoom out ()
- Available zoom levels ()
- Zoom to fit window ()
- Original image size ()
- Zoom in (
This section has covered the use of the Normal mode. For more information on using the Fixed mode, please read ![]() How to create an Icon with transparent background
How to create an Icon with transparent background
Working with styles
What is style? Icons Constructor is the only program that allows the unique opportunity of creating pretty icons with no need to possess any design skills. This is possible because the so-called "How to create Icon with transparent background". The author's job is as simple as selecting a style he likes and get an outstanding icon with little or no effort!
The styles allow applying all kinds of effects to a selected region of the original image. The diagram below demonstrates how the program creates an icon using styles:
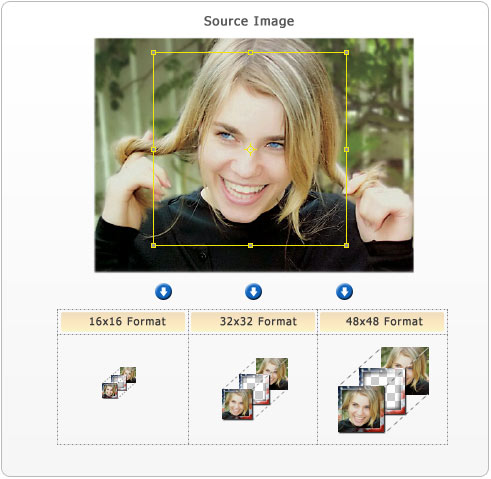
The program comes with over 70 worked-through ready-to-go styles you can start using instantly. Those are all kinds of border arts, masks, 3D-shapes, styles with national symbolism, and much more. Besides, you can download over a hundred other unique styles from our website.
Changing styles. The program's main window has the "Select Style" pane.
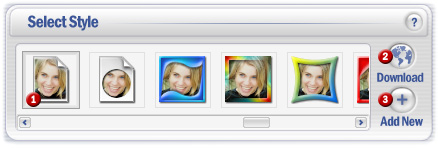
By default, when the program starts, it uses a simple style with the
black border. If you want to set a different style, simply click on the
style you like on the list (![]() )
on that pane. As it has been mentioned, besides the styles available in
the program, you can download over a hundred other unique styles from
the Icon Сonstructor website. To download more
styles, click on the Download (
)
on that pane. As it has been mentioned, besides the styles available in
the program, you can download over a hundred other unique styles from
the Icon Сonstructor website. To download more
styles, click on the Download (![]() )
button, and the program will open the page with the styles gallery.
Select the style you like in the gallery and then download it to your
hard drive. Next, to add the new style to the list, click on the Add New (
)
button, and the program will open the page with the styles gallery.
Select the style you like in the gallery and then download it to your
hard drive. Next, to add the new style to the list, click on the Add New (![]() )
button and locate the file you have downloaded from our website on your
hard drive. To delete an unnecessary style from the list, right-click on
the style to be deleted and then select the "Remove" on the menu
that appears.
)
button and locate the file you have downloaded from our website on your
hard drive. To delete an unnecessary style from the list, right-click on
the style to be deleted and then select the "Remove" on the menu
that appears.
Changing style color palette
For the sake of greater flexibility Icons Constructor supports the so-called changing styles' color palette. This mechanism allows configuring style colors to your discretion. The diagram below demonstrates how you can change the appearance of a style with a single move of the slider:

To change selected style's color palette:
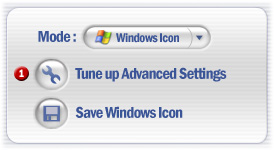
1) In the bottom-right corner of the program's main
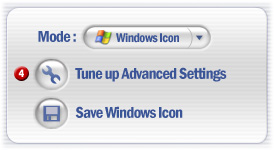
window, click on the Tune Up Advanced Settings (![]() ) button.
) button.
2) Now let's take a look at the Colorize Style section in the window that appears.
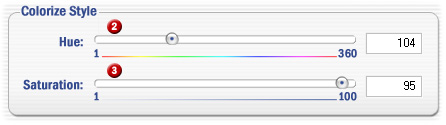
Hue (![]() )
sets hue gradations for the style. The values of 0 and 360 stand for the
original coloring.
)
sets hue gradations for the style. The values of 0 and 360 stand for the
original coloring.
Saturation (![]() )
sets the saturation of colors. When this value is set to zero, the style
becomes black and white; 100 enables the full-color style.
)
sets the saturation of colors. When this value is set to zero, the style
becomes black and white; 100 enables the full-color style.
As you change these parameters, you can instantly see the updated image in the preview pane just above the Colorize Style section.
3) Once the color palette is set, click on the OK button to continue.
Enabling/disabling styles
If you do not want to use styles or want to disable styles for some formats of your icon, use the Icon Settings pane in the program's main window.
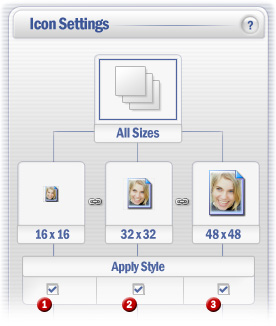
In the Icon Settings pane, you can enable/disable
styles for each icon format individually. Chechbox (![]() )
enables/disables styles for the size of 16x16, checkbox (
)
enables/disables styles for the size of 16x16, checkbox (![]() )
does the same for the size of 32x32, and checkbox (
)
does the same for the size of 32x32, and checkbox (![]() )
enables/disables styles for the size of 48x48.
)
enables/disables styles for the size of 48x48.
When styles are disabled, images will change as shown on the figure:
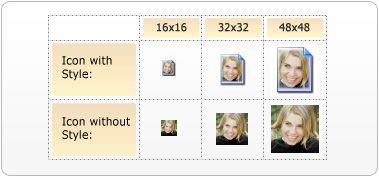
Basically, your icon with disabled styles will look like a smaller
copy of your original image. If the original image has transparent
areas, they will be filled with the color specified in the program's
settings. Just disabling styles will not let you
create icons with transparent areas. If you want to create an icon using
your original image's transparency, you will need to get further
instructions from this article ![]() How to create an Icon with transparent background.
How to create an Icon with transparent background.
Adjusting icon sharpness
Changing image size often makes the output image blurred. To improve the visual perception, such image will need more sharpness. Icon Constructor has a function that allows improving the appearance of an icon with the Sharpen effect. The diagram below demonstrates the example of an icon with and without the Sharpen effect:
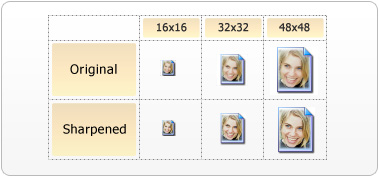
At the first moment, you may think that both of these icon sets are equal. However, if you take a closer look, you will feel the difference. The Sharpened set of icons looks way much prettier.
Enabling/disabling the Sharpen effect
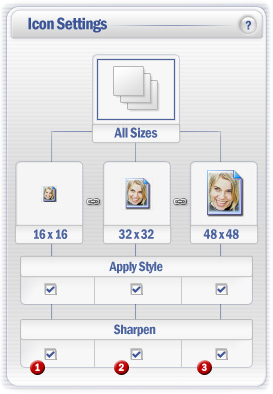
The Sharpen effect can be enabled or disabled in the Icon Settings pane in the program's main window. The Sharpen section has three
checkboxes, each of which applies the effect to the corresponding
format. Checkbox (![]() )
enables/disables the Sharpen effect for the size of 16x16, checkbox (
)
enables/disables the Sharpen effect for the size of 16x16, checkbox (![]() )
does the same for the size of 32x32, and checkbox (
)
does the same for the size of 32x32, and checkbox (![]() )
enables/disables the Sharpen effect for the size of 48x48 pixels.
)
enables/disables the Sharpen effect for the size of 48x48 pixels.
Adjusting opacity for the Sharpen effect
To adust Sharpen effect's settings:
1) In the bottom-right corner of the main window,
click on the Tune Up Advanced Settings (![]() ) button.
) button.
2) Now let's take a look at the Sharpen Settings section in the window that appears.
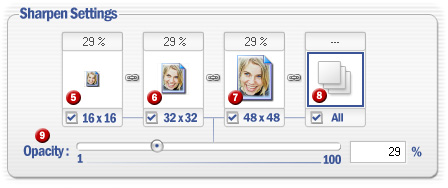
Just like the main dialog, this section allows enabling/disabling Sharpen
effects for all sizes or for each size individually, using the
checkboxes below the icons with different sizes. For adjusting the
effect's opacity, use the Opacity (![]() ) tool. The opacity level can be set for all sizes at once or for
each size individually. For example, select the size of 16x16 (
) tool. The opacity level can be set for all sizes at once or for
each size individually. For example, select the size of 16x16 (![]() )
by clicking on the corresponding icon and then set the desired opacity
level using the slider or the edit box. Current opacity value is
displayed above each size; it is given in the per cent units. To adjust
opacity for all sizes at once, select the All (
)
by clicking on the corresponding icon and then set the desired opacity
level using the slider or the edit box. Current opacity value is
displayed above each size; it is given in the per cent units. To adjust
opacity for all sizes at once, select the All (![]() )
checkbox.
)
checkbox.
3) Once the Sharpen effect is set, click on the OK button to continue.
Saving icon
1) In the bottom-right corner of the program's main
window, click on the Save Windows Icon (![]() ) button.
) button.
![]()
2) Next, in the export icon dialog that appears, set
the switch to the Save as Windows Icon (![]() )
mode.
)
mode.
![]()
3) To configure the list of formats to be included
in the icon, click on the Set Output Size & Formats (![]() )
button.
)
button.
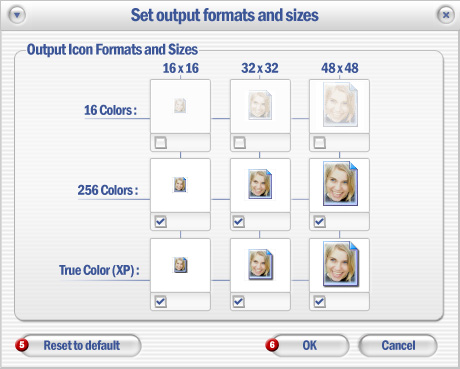
Select the required formats to be included in
the icon in the dialog that appears by clicking on the checkboxes by the
images. By default, the program will include all sizes with 256 and all sizes with colors RGB/A (True Color XP). If you
want to reset your selection to default, click on the Reset to Default (![]() ) button. When you are done with the settings, click OK (
) button. When you are done with the settings, click OK (![]() ) to
continue.
) to
continue.
4) 4) Now click Next (![]() )
in the Export Wizard dialog. In the Save As... window
that appears, select the folder where the icon will be saved and enter
the icon file name. Then click on the Save button to
finish.
)
in the Export Wizard dialog. In the Save As... window
that appears, select the folder where the icon will be saved and enter
the icon file name. Then click on the Save button to
finish.