

Home > Tutorials > Add a Favorite Icon to Your Web Site (favicon)
Add a Favorite Icon to Your Web Site (favicon)
In this manual:
- What is Favicon?
- Which formats are to be used for icons?
- Creating icon with Icon Constructor and setting it as favicon
- Binding icon to Web page
What is Favicon?
Some Web browsers, like Internet Explorer 5+, Mozilla Firefox, Opera and some others, allow adding a visual icon to website titles. This icon is also known as Shortcut Icon or Favorites Icon. When the icon is bound to a website, it appears in the left end of the address line and in your browser's Favorites menu if the address is added to Favorites.
![]()
Placing your company or portal logo as to Favicon allows you to distinguish your resource from other user's favorites. With Icon Constructor and our instructions, you can easily make your website much prettier!
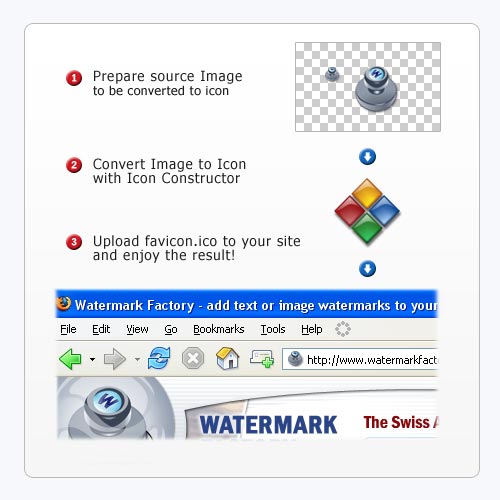
Just three simple steps, and your logo will appear in the browser's address bar!
Which formats are to be used for icons?
First of all, let's define formats that we will need to include in our icon to make it compatible with browsers.
We recommend including three formats that will be compatible with all of your website visitors' browsers:
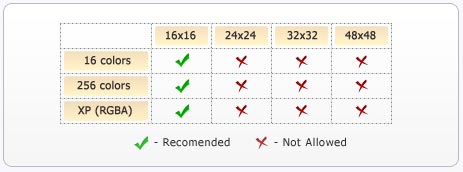
Make sure your icon contains these formats only; if you include a format of a different size to your icon - for example, 32x32 or 48x48 - a browser may simply ignore it and not bother displaying it. The next topic describes how to prepare an icon and make it compatible with the list of formats provided on the list above.
Creating icons with Icons Constructor setting it as favicon
Icon Constructor allows converting both photographs and images with transparent areas to icons. The icon creation technique has been covered in these articles:
![]() How to create Icon with transparent background
How to create Icon with transparent background
Following these directions, you will need to create and then save an icon. The only thing we should notice is make sure the format of icon you select on the last step of the conversion is valid for Favicon, as described in the previous topic. When saving icon, please follow these instructions:
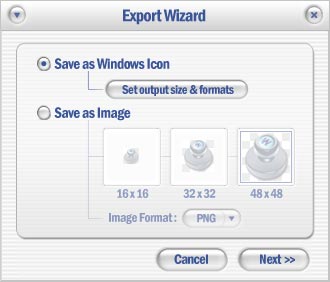
1) Clicking on the Save Windows Icon button opens the export dialog. In that dialog, select the Save as Windows Icon item and then click on the Set output size & formats button for selecting necessary formats.
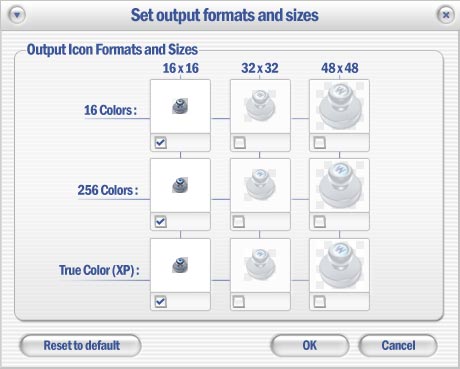
2) In the dialog that appears, select three formats with size of 16x16: 16 colors, 256 colors and True Color(XP), as shown on the figure, and then click OK.
3) In the export dialog, click Next. In the save file dialog that appears, select path to folder where the icon will be saved and enter the icon file name 'favicon.ico'.
Binding icon to Web page
Once the icon is saved, we will need to bind it to our website. Here is how we are going to do that:
1) Rename your icon file to "favicon.ico" if its name is still different. If your icon file name is other than "favicon.ico", Web browsers will ignore your icon.
2) Run the FTP program you use for working with your website.
3) When you are connected with your FTP server, copy your icon to the root folder of your website, the same where the home page is located.
4) After that, open your home page with a Web browser and make sure the icon appears properly.
Besides this, there is another way to bind icon with each page of your website explicitly. Simply add this line to HTML code of your pages:
| <HEAD> <LINK REL="SHORTCUT ICON" HREF="http://www.yourdomain.com/icon.ico"><TITLE>Page Title</TITLE> </HEAD> |
As the example shows, this way you can use an icon file with any name, not necessarily "favicon.ico". However, you will need to specify its location explicitly by entering the HREF property of the LINK tag.