

1. Selecting a generation mode
When starting the program, the very first thing you see is the dialog for choosing a generation mode:

Here you should clarify what you want to create. In this manual, we consider creation of a Windows icon. To do that, select the "Windows Icon" bookmark (1), and then press the "Create" button (2).
2. Selecting a source image for conversion
As soon as you chose a generation mode, it is necessary to load an image, which you wish to convert to an icon. Icon Constructor supports all basic image formats. The program also allows to import frames from .avi, .mpg and .swf files, in order to use them as images for further conversion to an icon.
2.1 Loading

To begin loading a picture, press the "Load" button (1) in the main menu of the program.
2.2 Selecting type of a loaded file

As it was mentioned above, for conversion Icon Constructor uses standard images, as well as frames from video and flash-clips.
Select the "Load Image" section (1), if you want to use a photograph or any other images, "Select frame from Movie Clip" (2) if you want to use a frame from your favorite movie or your home video, "Select frame from Flash Clip" (3) if you want to use a picture from a flash-clip.
After you selected type of the file to be loaded, press the "Next" button (5), and then select a file from your hard drive.
If you do not want the dialog to be displayed each time you launch the program, you can turn it off with the help of the "Show next time" flag (4). Next time you start the program, you will right away see the dialog for selecting either an image, or a video clip.
2.3 Selecting a frame from a video clip (.avi, .mpg)
If you selected "Movie Clip" during file loading, on this step it would be necessary to specify a frame, so that the frame could be converted to an icon.

The frame selector is represented as an ordinary video player, with possibility of fine adjustment of any specified frame. The following buttons are used for playback controlling: "Play/Pause" (8), "Stop" (9), "Move Begin" (7), and "Move End" (10). The "Position" field (6) shows exact frame position by the "hour: minute : second : frame" scheme. The following buttons can be used for fine adjustment of a frame: "Previous Frame" (2), "Next Frame" (5), "Previous Second" (3), and "Next Second" (4). For positioning, you can also use the slider (5), which, in its turn, displays current position as a percentage value relatively to total number of frames. When working with the selector, the "Preview" field (1) always displays a selected frame. After you specified a frame, which you want to use for conversion, press the "Select" button (11) to continue working.
2.4 Selecting a frame from a Flash-clip (.swf)
If you selected "Flash Clip" during file loading, it would be necessary to specify a frame on this step, so that the frame could be converted to an icon.

The frame selector is represented as an ordinary video player, with possibility of fine adjustment of any specified frame. The following buttons are used for playback controlling: "Play/Pause" (9), "Stop" (10), "Move Begin" (8), and "Move End" (11). The "Position" field (6) shows the number of the frame you select. The following buttons can be used for fine adjustment of a frame: "Previous Frame" (2), "Next Frame" (5), "Previous Second" (3), and "Next Second" (4). For positioning, you can also use the slider (6), which, in its turn, displays current position as a percentage value relatively to total number of frames. After you specified a frame, which you want to use for conversion, you should press the "Select" button (12) to continue working.
3. Editing a source image
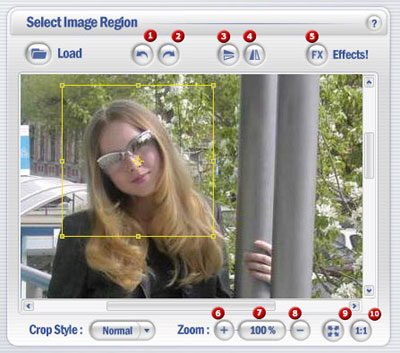
After loading a source image or a frame from a video clip, you can edit your picture before converting it. Icon Constructor supports the following editing functions: "Rotate Left" (1) - rotate picture anticlockwise by 90 degrees, "Rotate Right" (2) - rotate picture clockwise by 90 degrees, "Flip Vertically" (3) - flip the picture vertically, "Flip Horizontal" (4) - flip the picture horizontally.
Also, by pressing the "Effects!" button (5), you can apply either "monochrome" or "sepia" effect, as well as adjust brightness/contrast of the image.

In the "Effects" group (2), select an effect you need. If you want to leave the picture unchanged, move the selector to the "Empty" field. To change brightness and/or contrast, the "Brightness-Contrast" group (3) is used. To apply the default settings, use the "Reset" button (4).
4. Selecting a style
In the program, a set of icon styles is available. Using the "Download" you can download additional styles from the website (the program goes to http://www.iconconstructor.com/styles.htm). To add a previously downloaded style file from your hard drive, use the "Add New" button.

A style can be applied either to all sizes ("or to selected sizes only. For more details about icon sizes, please visit http://www.iconconstructor.com/what_is_windows_icon.htm

In the same way, by using the "Sharpen" boxes, you can sharpen icons of all sizes or those of selected sizes only.
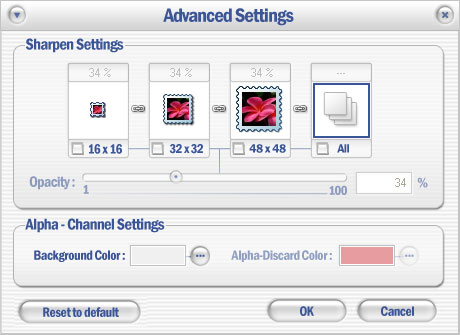
5. Advanced Settings
In the "Adjust Advanced Settings" section, you can control sharpen settings by adjusting opacity (from 1-100%).
The "Alpha Channel" section allows you to fill semitransparent background areas of the image with a selected color.
6. Saving results
As it was mentioned above, the results could be represented as Windows icon, e-mail shortcut, AIM Buddy icon, or ICQ shortcut. In addition, you can assign an icon to a folder.
6.1 Saving Windows icons
Select the "Windows Icon" mode.
Pressing the "Save Windows Icon" button opens the "Export Wizard" dialog.
The dialog allows you to save the program work result either as an .ico file or as a graphic file (JPG, GIF, BMP, TGA, and PNG).
If you select "Save as Windows Icon" mode, press the "Set output size
and formats" button to select colors and sizes for the icon components
you wish to save. For more details about windows icons, please visit
http://www.iconconstructor.com/what_is_windows_icon.htm
Click "Next" to select a destination folder and save the icon.
If you select the "Save as image" mode, you would need to choose size and format for the resulting picture. Then press the "Next" button to set parameters for the graphic file. The dialog allows you to adjust parameters, which are specific to the selected format. Click "Save" to select a destination folder and save the image.
6.2 Saving e-mail shortcuts
Select the "E-mail Shortcut" mode.
Pressing the "Create E-mail Shortcut" button opens the "E-mail Shortcut" dialog. Here you can specify name and e-mail address of the person you create the shortcut for.
Clicking on the resulting icon launches your default e-mail program, and you will be able to write a new message to the recipient specified.
6.3 Assigning icon to a folder
Select the "Skinned Folder" mode. Pressing the "Assign icon to folder" button opens browser, in which you can select a necessary folder.
6.4 Saving AIM Buddy icons
Select the "AIM Buddy Icon" mode.
Press the "Save" button to save the result as an AIM icon.
6.5 Saving ICQ user shortcut
Select the "ICQ Shortcut" mode. Press the "Save ICQ user shortcut" button and then specify a username and ICQ number. Clicking on the resulting icon launches ICQ dialog window of the contact specified.
7. Help
The buttons with question marks open a help file for the corresponding section of the program.
If you have any further questions, send a query to support@iconconstructor.com
In your message:
-
If you are a registered user, please specify your product key.
-
Describe the problem you facing.
-
The subject of the message must contain the name of the program so the message would not be considered as spam.